

Basic Git & GitHub for DevOps Engineers | Part-1
Day 8 - #90DaysOfDevOps Challenge


In today's fast-paced world of software development, collaboration and version control are key. That's where Git and GitHub come in - these tools make it easier for developers to work together on projects, manage changes to their codebase, and keep track of their progress. In this article, we'll cover the basics of Version control, Git, and GitHub aimed specifically at DevOps engineers. By the end of the article, you'll have a good understanding of these critical tools and we'll also set up a GitHub account and complete some tasks to enhance our understanding. Please note that we'll cover only the essentials, but this foundation will equip you to explore more advanced topics later on. So, let's get started!
Version Control & its Types
Version control is a system that tracks changes to a file or set of files over time so that you can recall specific versions later. It allows you to revert files back to a previous state, revert the entire project back to a previous state, compare changes over time, see who last modified something that might be causing a problem, who introduced an issue and when, and more. It's like a time machine that allows developers to go back in time and see how their code has changed.
There are two main types of version control systems:
Centralized Version Control Systems (CVCS)
A centralized version control system (CVCS) uses a central server to store all the versions of a project's files. Developers "check out" or "Update" files from the central server, make changes, and then "check in" or "Commit" the updated files.
Examples of CVCS include Subversion (SVN) and Perforce.

Distributed Version Control Systems (DVCS)
In a Distributed Version Control System (DVCS), developers have the ability to make a complete copy of the entire project repository, including all of its past versions and branches, on their own local machine. This allows developers to work independently, experiment with different features, and make changes to their own copy without affecting the main repository. Once they are ready to share their work with the rest of the team, they can merge their changes back into the main repository.
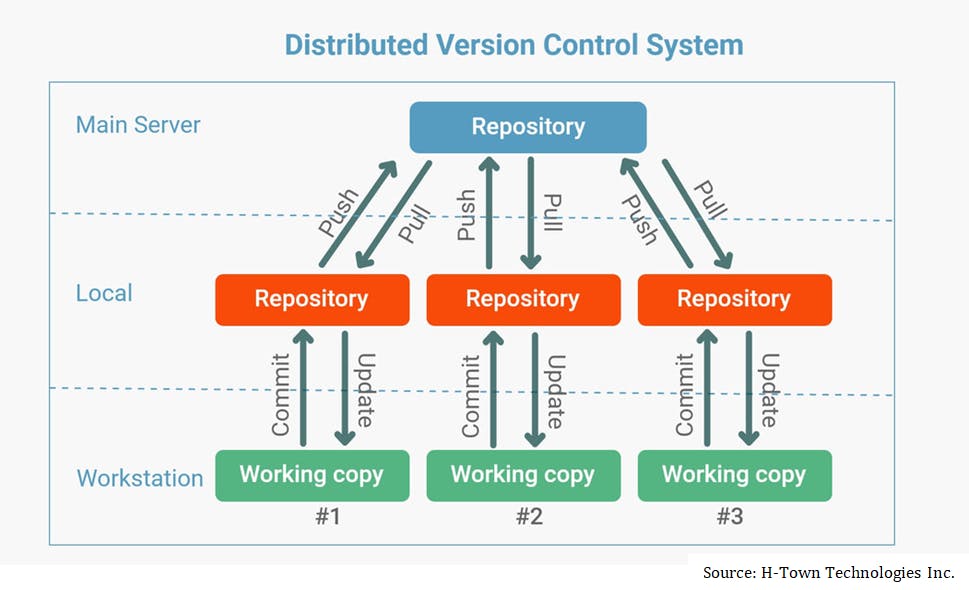
Both CVCS and DVCS have their own advantages and disadvantages, but DVCS has become more popular in recent years due to its flexibility, speed, and distributed nature. Git, in particular, has become one of the most widely used version control systems in the software development industry, especially for open-source projects. Let's discuss it in detail.
Why do we use distributed version control over centralized version control?
Better collaboration: In a DVCS, every developer has a full copy of the repository, including the entire history of all changes. This makes it easier for developers to work together, as they don't have to constantly communicate with a central server to commit their changes or to see the changes made by others. This not only makes the process more streamlined but also reduces the risk of conflicting changes.
Improved speed: Because developers have a local copy of the repository, they can commit their changes and perform other version control actions much faster, without waiting for the central server to respond. This improves overall speed and productivity.
Greater flexibility: DVCS provides greater flexibility to developers. They can work offline and commit their changes later when they have an internet connection. They can also choose to share their changes with only a subset of the team, rather than pushing all of their changes to a central server, which can be helpful in situations where some parts of the team are working on different aspects of the project.
Enhanced security: In a DVCS, the repository history is stored on multiple servers and computers, which makes it more resistant to data loss. If the central server in a CVCS goes down or the repository becomes corrupted, it can be difficult to recover the lost data.
Overall, the decentralized nature of a DVCS provides several benefits, including better collaboration, improved speed, greater flexibility, and enhanced security. It's no surprise that many teams prefer DVCS over traditional CVCS.
Let's understand the buzzwords Git and GitHub.
What is Git?
Git is a free and open-source distributed version control system that helps developers keep track of changes to their code over time. It allows multiple people to work on the same project and makes it easy to go back to an earlier version if needed. Git also makes it easy to collaborate with others, as you can share changes and merge the changes made by different people into a single version of a file. In short, Git helps developers work together on a project and keep track of their progress.
What is GitHub?
- GitHub is a web-based platform that provides hosting for version control using Git. It is a subsidiary of Microsoft, and it offers all of the distributed version control and source code management (SCM) functionality of Git as well as adding its own features.
GitHub makes it easy to store and share code with others. It's like a central hub where developers can collaborate on projects, share their code, and contribute to open-source projects.
GitHub uses Git as its underlying technology, which means that developers can use Git to manage changes to their code and then store it on GitHub. This makes it easier for teams to work together on projects and for open-source projects to accept contributions from others.
Stages in Git
There are three main stages in Git:
Working Directory: This is where the current development is done. The working directory is the actual directory where the files and directories are stored on your local machine.
Staging Area: This is also known as the index. The staging area is where you stage your changes. When you are happy with the changes you have made to your files in the working directory, you can add them to the staging area. This is done using the "git add . " command. The staging area is like a holding area where you can group your changes together before committing them.
Repository: The repository is where Git permanently stores your changes. When you are ready to save your changes, you commit them to the repository using the "git commit" command. The repository contains a complete history of all changes to your project, allowing you to easily revert back to previous versions if needed.

Installation of Git
Linux :
You can install Git in your Linux system very easily just by running a few commands using the preferred package manager of your Linux distribution. Here we install Git in Ubuntu. Run the below command to install git in Ubuntu.
sudo apt-get install git
To check the version of your installed git, use the below command -
git --version
For other distributions of Linux refer to this official documentation to install Git -
https://git-scm.com/download/linux
Windows and macOS:
Follow the official documentation for downloading Git on Windows and macOS
Create a free account on GitHub
Follow the steps below to create a free account on GitHub-
Go to GitHub homepage at https://github.com/ and click on the " Sign-up" button located at the top right corner of the page.
On the next page, enter your email address and a strong password and click on "Continue".
You will be asked to Enter a username, provide a desired username and proceed.
Next, if you want to receive product updates and announcements via email, provide "y" for yes or "n" for no.
To verify your account, you will be asked to solve a simple puzzle. Once done click on "Create account".
Verify your email address by entering the code sent to your email.
Next, you'll be asked to provide some additional information such as your experience level with coding and your primary role (e.g. student, professional).
After completing the additional information, on the next page to select "Free" as the plan click on the "Continue as Free" button.
Congratulations! You have successfully created your free GitHub account.
You can now start using GitHub to store your code, collaborate with others, and contribute to open-source projects.
TASKS
1) Create a new repository on GitHub and clone it to your local machine.
2) Make some changes to a file in the repository and commit them to the repository using Git.
3) Push the changes back to the repository on GitHub.
1) Create a new repository on GitHub and clone it to your local machine
1) From the top-right corner of the page click on the ' + ' sign drop-down menu and select "New repository" as shown below.

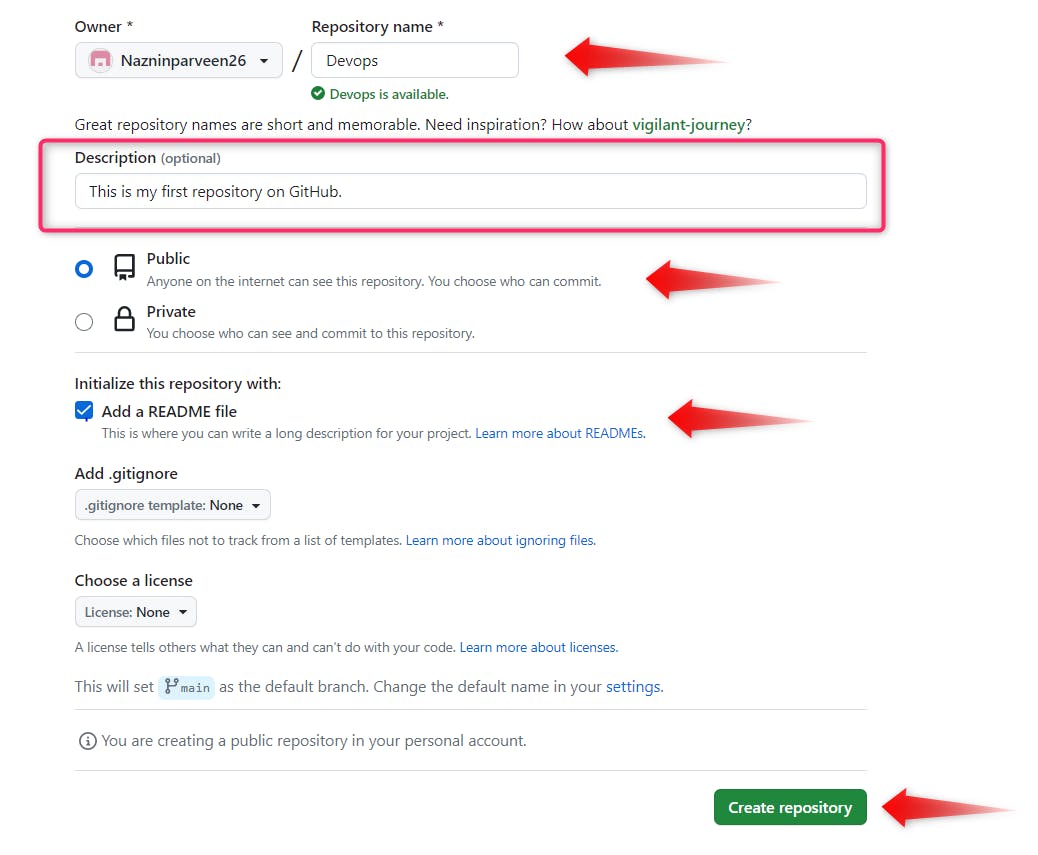
2) On the next page, provide a short name of your repository such as I am using here "DevOps" and add a description of your repository (optional). For example, "This is my first repository on GitHub."
3) Choose a repository visibility: Public or Private. We will keep it public here.
4) Select Initialize this repository with a README.
5) Click Create repository.
Congratulations! We have created our first repository and initialized it with a README file.

Cloning a repository
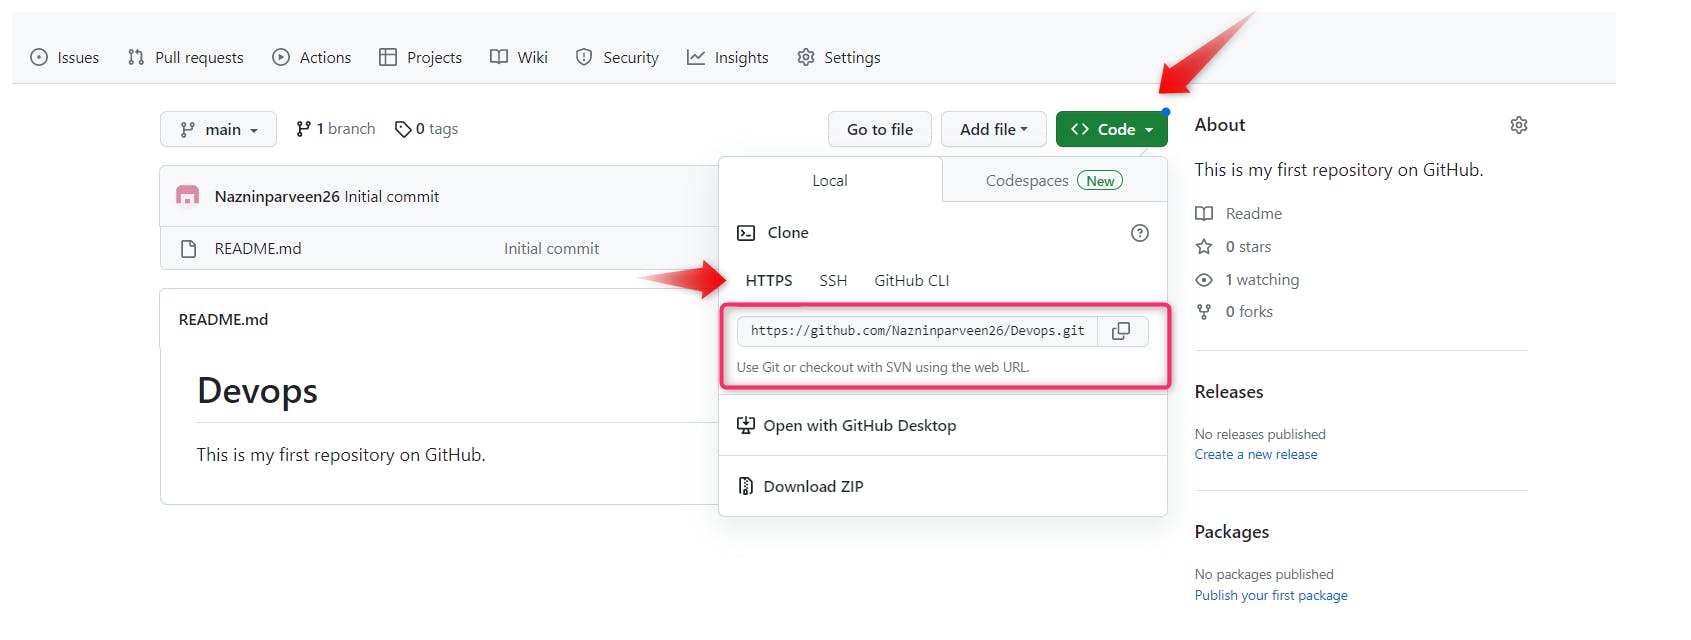
1) Go to the main page of the repository and click on <> Code button.
You can clone the repository using HTTPS, SSH Key or GitHub CLI. We will use HTTPS here, copy the URL provided for HTTPS as shown below.
2) You'll need to open your command-line interface and navigate to the directory where you want the cloned repository to be saved.
3) Run the below command to clone the repository.
(after the git clone command, paste the HTTPS URL which we have copied in previous steps)
$ git clone <Repository_name>
We have finally cloned the Git Repository into our local machine.

2) Make some changes to a file in the repository and commit them to the repository using Git.
Firstly, create a text file and add some content to it using any editor of your choice.
We will commit this file into the repository using Git. Run the below commands to commit the file.
# Initializes a new Git repository
git init

# Adds all new and modified files to the staging area to be committed
git add .

# Records changes to the repository with a commit message describing the changes made
git commit -m 'Commit message'

# Checks the current status of the repository and see which files are modified and ready to be committed
git status

We have successfully committed our file to the local repository.
3) Push the changes back to the repository on GitHub
1) To push the code to the GitHub repository, we have to create a "Personal Access Token" in GitHub.
Follow this documentation to generate a token(classic) -
Note: Make sure to save this token securely.
2) To push the changes to the GitHub repository, run the below commands ( paste the token generated in step 1 in the command below)
git remote set-url origin https://<Personal_access_token>@github.com/<repo/path>


git push -u origin main

3) Go to your GitHub and validate, you should notice your file is pushed successfully into your repository.

Great job! We've made it to the end of this article and now have a basic foundation on Git and GitHub. Don't stop here, there's so much more to explore and learn in the world of Git and GitHub. In the next article, we'll dive deeper into advanced Git and GitHub concepts, so stay tuned and keep up the great work. You got this!